How HC-SR501 PIR Sensor Works & Interface It with Arduino
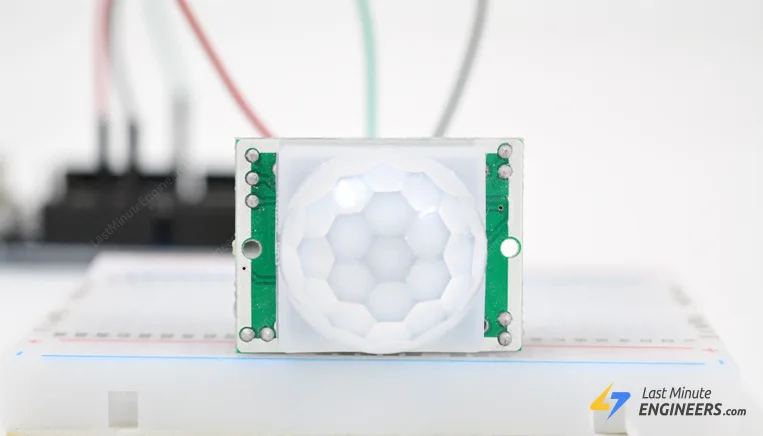
Whether you want to build a home burglar alarm or a trail camera, or perhaps you want to wake up animated Halloween props when trick-or-treaters come to your door, then you should definitely consider getting an HC-SR501 Passive Infrared (PIR) sensor for yourself.
The PIR sensor allows you to detect when a person or animal moves in or out of sensor range. This sensor is what you’ll find in most modern security systems, automatic light switches, garage door openers and similar applications where we want to react to motion.
Before getting into the nitty-gritty, let’s first understand how a PIR sensor actually works.
How does a PIR sensor work?
All objects, including the human body, at temperatures above absolute zero (0 Kelvin / -273.15 °C) emit heat energy in the form of infrared radiation. The hotter an object is, the more radiation it emits. This radiation is not visible to the human eye because it is emitted at infrared wavelengths. The PIR sensor is specifically designed to detect such levels of infrared radiation.
A PIR sensor consists of two main parts:
-
- A pyroelectric sensor, which you can see in the image below as a round metal with a rectangular crystal in the center.
- A special lens called a fresnel lens which Focuses the infrared signals on the pyroelectric sensor.
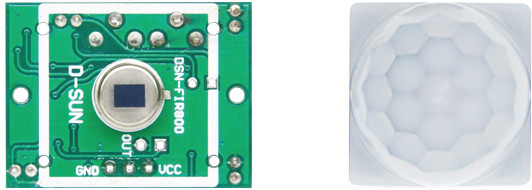
The Pyroelectric Sensor
A pyroelectric sensor consists of a window with two rectangular slots and is made of a material (typically coated silicon) that allows infrared radiation to pass through. Behind the window, there are two separate infrared sensor electrodes, one responsible for producing the positive output and the other for producing the negative output.
The two electrodes are wired such that they cancel each other out. This is because we are looking for changes in IR levels and not ambient IR levels. That’s why when one half sees more or less IR radiation than the other, we get the output.
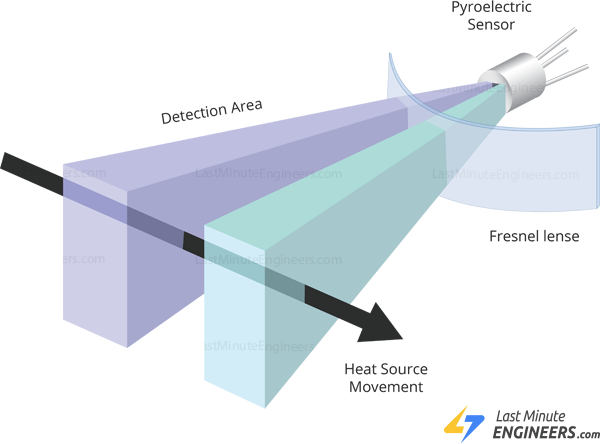
When there is no movement around the sensor, both slots detect the same amount of infrared radiation, resulting in a zero output signal.
But when a warm body like a human or an animal passes by, it first intercepts half of the sensor. This causes a positive differential change between the two halves. When the warm body intercepts the other half of the sensor (leaves the sensing region), the opposite happens, and the sensor produces a negative differential change. By reading this change in voltage, motion is detected.

The Fresnel Lens
You may feel that the Fresnel lens used here is not really doing anything. In fact, this is what increases the range and field of view of the PIR sensor. Its slim, lightweight construction and excellent light gathering capability make it extremely useful for making PIRs small in size yet powerful.
A Fresnel lens consists of a series of concentric grooves carved into the plastic. These contours act as individual refracting surfaces, gathering parallel light rays at a focal point. As a result a Fresnel lens, although smaller in size, is able to focus light similarly to a conventional optical lens.
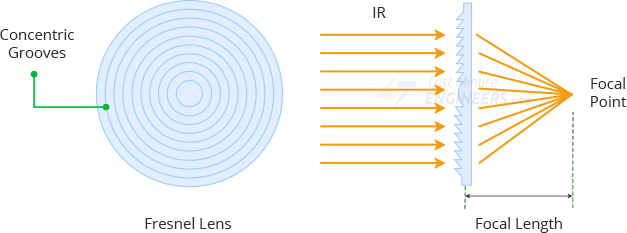
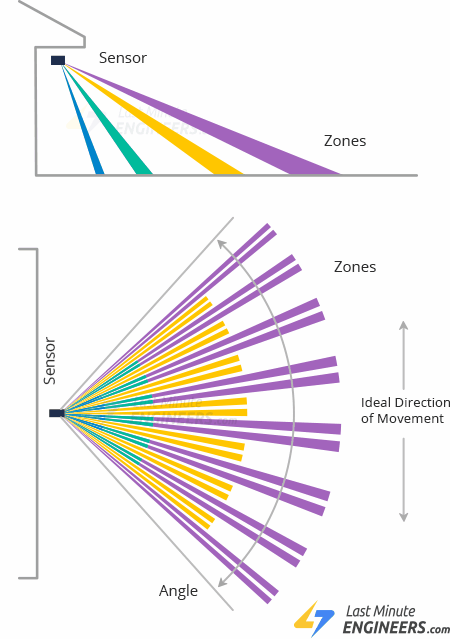
In reality, to increase the range and field of view of the PIR sensor, the lens is divided into several facet-sections, each section of which is a separate Fresnel lens.

The different faceting and sub-lenses create a range of detection areas/zones, interleaved with each other. That’s why the centers of the lenses are ‘inconsistent’ in the image above – every other one points to a different half of the PIR sensing element.
HC-SR501 PIR Sensor Hardware Overview
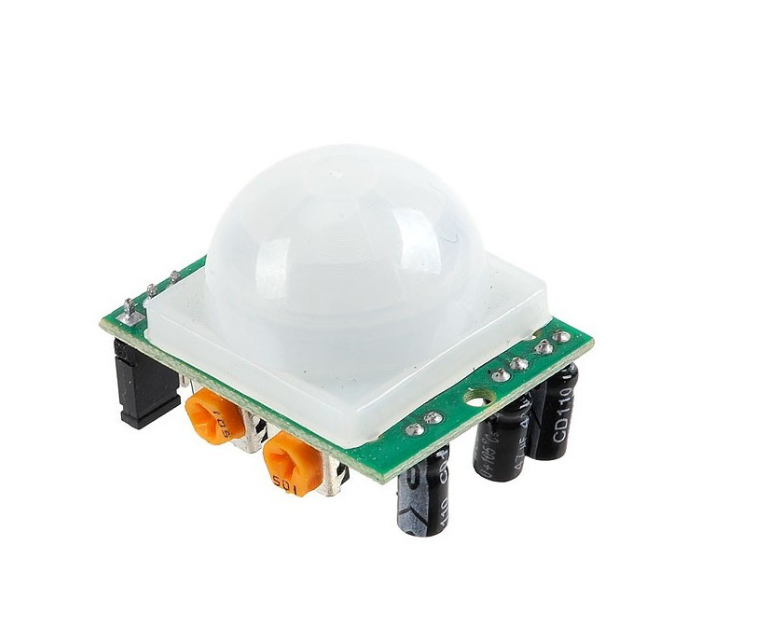
For most of our Arduino projects that require detecting whether someone has left or entered the area, the HC-SR501 PIR sensor is a great choice. It is low power, low cost, easy to interface and extremely popular among hobbyists.
This PIR sensor itself is pretty straightforward and works out of the box. Simply apply power 5V – 12V and ground. The sensor output goes HIGH when motion is detected and goes LOW when idle (no motion detected).
By connecting this output to the microcontroller, you can react to motion by turning lights ON/OFF, enabling a fan, enabling a Halloween prop, or perhaps taking a picture of an intruder.
And the best part is that it consumes less than 2mA of current and can detect motion up to 7 meters (21 ft) with sensitivity control.
BISS0001 PIR Controller
At the heart of the module is a passive infrared (PIR) controller IC – BISS0001. Because of the noise immunity it provides, the BISS0001 is one of the most stable PIR controllers available.
This chip takes the output from the Pyroelectric sensor and does some minor processing on it to emit a digital output pulse.
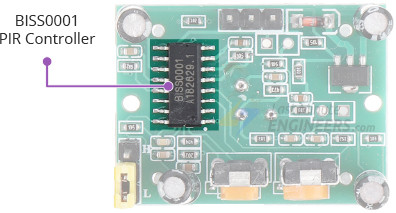
You can find out more about BISS0001 from the datasheet.
Power
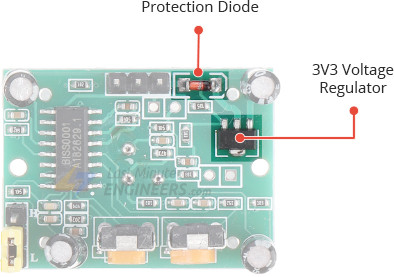
The module comes with a 3.3V precision voltage regulator, so it can be powered by any DC voltage from 4.5 to 12 volts, although 5V is commonly used.
The module comes with a protection diode (also known as a safety diode) to protect the module from reverse voltage and current. So even if you accidentally connect the power with incorrect polarity, your module will not be damaged.
Sensitivity Adjustment
The PIR sensor has a potentiometer on the back to adjust the sensitivity.
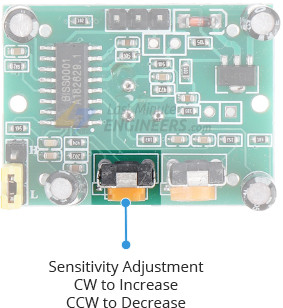
This potentiometer sets the maximum detection range. Sensitivity can be adjusted over a range of approximately 3 meters to 7 meters (9 to 21 feet). However the topology of your room can affect the actual range you get. Rotating the pot clockwise will increase the sensitivity and thus the range, and vice versa.
Time-Delay Adjustment
There is another potentiometer on the back of the PIR sensor to adjust the Time-Delay.
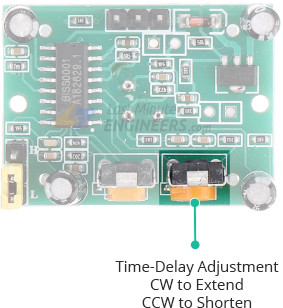
This potentiometer sets how long the output will remain HIGH after motion is detected. It can be adjusted from 1 second to about 3 minutes. Turning the potentiometer clockwise increases the delay, while turning the potentiometer counter-clockwise decreases the delay.
Trigger Selection Jumper
There are two trigger modes that determine how the sensor will react when motion is detected.
Single Trigger Mode: The constant motion will cause a single trigger.
Multiple Trigger Mode: The constant motion will cause a series of triggers.
The board comes with a berg jumper (some modules have a solder bridge jumper) allowing you to choose one of two modes:
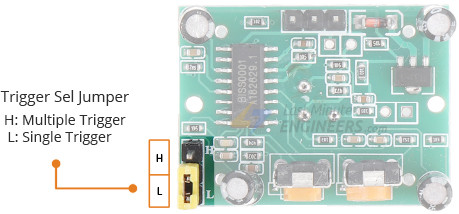
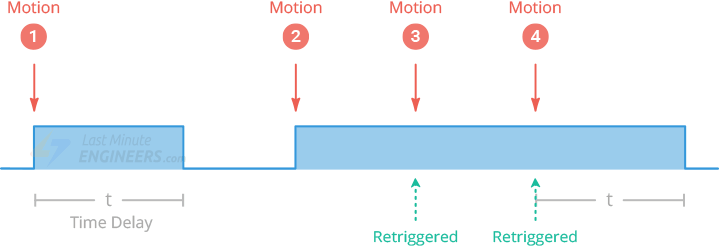
L – Selecting this will set the single trigger mode. In this mode the output goes HIGH as soon as motion is detected and remains HIGH for a period determined by the Time-Delay potentiometer. Further detection is blocked until the output returns to LOW at the end of the time delay. If there is still motion, the output will go HIGH again. As you can see in the image below, Motion #3 is completely ignored.

H – Selecting this will set the multiple trigger mode. In this mode the output goes HIGH as soon as motion is detected and remains HIGH for a period determined by the Time-Delay potentiometer. Unlike single trigger mode, further detection is not blocked, so the time delay is reset each time motion is detected. Once the motion stops, the output returns to LOW only after a time delay. Hence the name multiple trigger mode.
Optional Components – Thermistor and LDR
The HC-SR501 module has solder pads for two additional components. These are usually labeled as ‘RT’ and ‘RL’. Note that on some boards the label may be covered by a Fresnel len on the opposite side of the components.
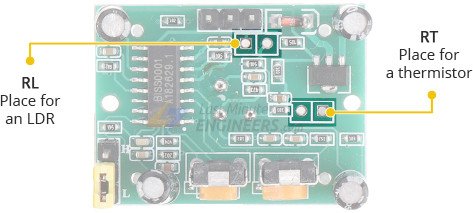
RT – This connection is for a thermistor or temperature-sensitive resistor. Adding this allows the HC-SR501 to be used in extreme temperatures. This also increases the accuracy of the detector to some extent.
RL – This connection is for Light Dependent Resistor (LDR) or Photoresistor. Adding this component allows the HC-SR501 to operate in the dark. This is useful for building motion-sensitive lighting systems.
These additional components can be soldered directly to the module or extended to remote locations using wires and connectors.
Technical Specifications
Here are the specifications:
| Operating Voltage | 4.5 – 20V (typically 5V) |
| Maximum Current Draw | < 2mA |
| Time Delay | ~ 1 sec to 3 min |
| Detection Distance | 3 – 7 meters (9 – 21 feet) |
| Detection Angle | 120 degrees (typically) |
HC-SR501 PIR Sensor Pinout
The HC-SR501 has a 3-pin connector. The markings are hidden by the Fresnel lens, so refer to the following image for pinout.
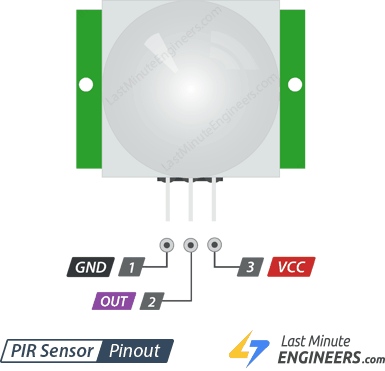
VCC is the power supply for the sensor. You can connect an input voltage anywhere between 5 to 12V to this pin, although 5V is commonly used.
Output pin is the 3.3V TTL logic output. It goes HIGH when motion is detected and goes LOW when idle (no motion detected).
GND is the ground pin.
Using PIR Sensor as a standalone unit
One of the reasons why the HC-SR501 PIR sensor is extremely popular is that the HC-SR501 is a very versatile sensor that is quite capable on its own. You can increase its versatility even further by connecting it to a microcontroller like Arduino.
For our first experiment, we’ll use the HC-SR501 to show how useful it is on its own.
The wiring for this experiment is very simple. Connect the batteries to the sensor’s VCC and GND and a small red LED to the output pin via a 220Ω current limiting resistor. That’s all!
Now when the PIR detects motion, the output pin will go “HIGH” and light up the LED!
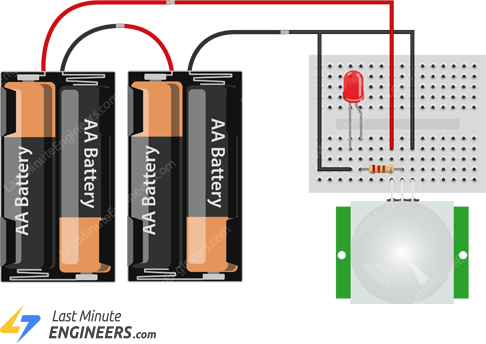
Remember that once you power up the circuit you need to wait 30-60 seconds for the PIR to adapt to the infrared energy in the room. The LED may blink a bit during that time. Wait until the LED is completely off and then walk around in front of it or wave a hand and watch the LED light up accordingly.
This PIR output can be connected directly to a relay module if you want to turn something ON/OFF based on motion.
Wiring a PIR Sensor to an Arduino
Now that we have a complete understanding of how the PIR sensor works, we can start connecting it to our Arduino!
Connecting the PIR sensor to the Arduino is really simple. Power the PIR with 5V and connect ground to ground. The PIR acts as a digital output, so all you have to do is listen to the output pin. So connect the output to Arduino’s digital pin #2.
For the HC-SR501 to function correctly, set the jumper to the H (Multiple Trigger Mode) position. You will also need to set the Time-Delay to at least 3 seconds, turn the Time-Delay potentiometer counterclockwise as far as it will go. Finally set the sensitivity potentiometer to any position you like or, if you are not sure, set it to the midpoint.
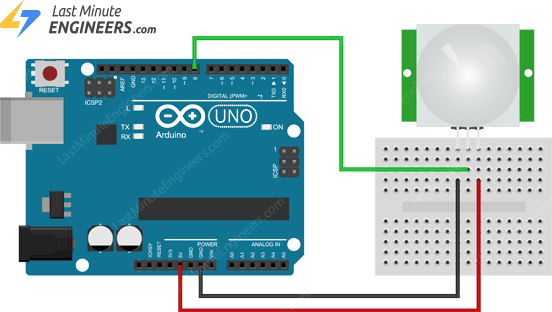
Now you are ready to upload some code and get the PIR working.
Arduino Example Code
The code is very simple. It basically just keeps track of whether the input to pin #2 is HIGH or LOW.
int ledPin = 13;                // choose the pin for the LED
int inputPin = 8;               // choose the input pin (for PIR sensor)
int pirState = LOW;             // we start, assuming no motion detected
int val = 0;                    // variable for reading the pin status

void setup() {
  pinMode(ledPin, OUTPUT);      // declare LED as output
  pinMode(inputPin, INPUT);     // declare sensor as input

  Serial.begin(9600);
}

void loop(){
  val = digitalRead(inputPin);  // read input value

  if (val == HIGH)	// check if the input is HIGH
  {
    digitalWrite(ledPin, HIGH);  // turn LED ON

    if (pirState == LOW)
	{
      Serial.println("Motion detected!");	// print on output change
      pirState = HIGH;
    }
  }
  else
  {
    digitalWrite(ledPin, LOW); // turn LED OFF

    if (pirState == HIGH)
	{
      Serial.println("Motion ended!");	// print on output change
      pirState = LOW;
    }
  }
}
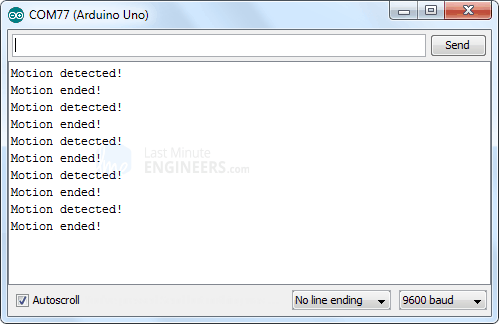
With the sensor pointing up, swipe your hand over the sensor. You should see a “Motion Detected” message printed on the serial terminal.
Things to consider before designing PIR based applications
When designing a system based on the HC-SR501 you need to keep the following delay periods in mind.Lockout Time
When the sensor output goes LOW, it will remain LOW for about 2 seconds. During this, the motion sensing is locked-out.

For example, let’s say you have set the sensor for a time-delay of 4 seconds and set the jumper to ‘L’. So when you wave your hand in front of the sensor, the output will go HIGH for 4 seconds and then LOW for about 2 seconds. Any motion in this period is completely ignored; as you can see Motion #2 is ignored here.
Power On Delay
Like most PIR sensors, the HC-SR501 takes approximately 30 to 60 seconds after being turned on to go through the initialization sequence. At that time it learns the ambient infrared signature of the environment. Basically it’s calibrating itself to the environment to determine what constitutes motion.
False triggers are likely to occur during this calibration time, so any triggers during this time should be ignored. Also make sure that there is not too much movement in front of the sensor when it is undergoing self-calibration as this may interfere with the calibration process.
Only logged in customers who have purchased this product may leave a review.







Reviews
There are no reviews yet.