How MQ2 Gas/Smoke Sensor Works? & Interface it with Arduino
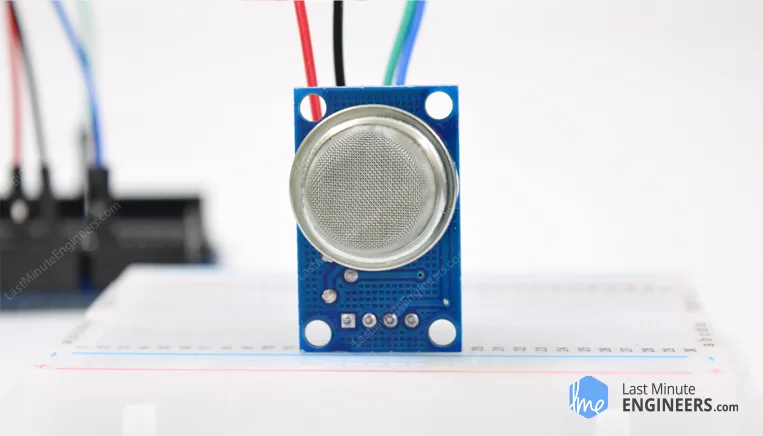
Give your next Arduino project a nose for gasses by including the MQ2 gas sensor module. It is a versatile sensor that can detect LPG, smoke, alcohol, propane, hydrogen, methane, and carbon monoxide concentrations in the air.
This makes the MQ2 Gas Sensor Module an excellent choice for building an indoor air quality monitoring system, a breathalyzer, or an early fire detection system.
MQ2 Gas Sensor
The MQ2 sensor is one of the most widely used in the MQ sensor series. It is a MOS (Metal Oxide Semiconductor) sensor. Metal oxide sensors are also known as Chemiresistors because sensing is based on the change in resistance of the sensing material when exposed to gasses.
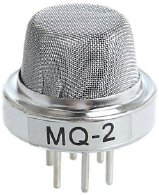
The MQ2 gas sensor operates on 5V DC and consumes approximately 800mW. It can detect LPG, Smoke, Alcohol, Propane, Hydrogen, Methane and Carbon Monoxide concentrations ranging from 200 to 10000 ppm.
What does the concentration of 1 ppm mean?
Parts-per-million, or ppm for short, is the most commonly used unit for measuring gas concentration. ppm is simply the ratio of one gas to another. For example, 500ppm of carbon monoxide means that if you could count a million gas molecules, 500 would be carbon monoxide and the remaining 999500 would be other gasses.
Note that the MQ2 gas sensor detects multiple gases, but cannot identify them! That is normal; most gas sensors operate in this manner. Therefore, it is best suited for measuring changes in a known gas density rather than detecting which one is changing.
Internal structure of MQ2 Gas Sensor
The MQ2 is a heater-driven sensor. It is therefore covered with two layers of fine stainless steel mesh known as an “anti-explosion network”. It ensures that the heater element inside the sensor does not cause an explosion because we are sensing flammable gasses.
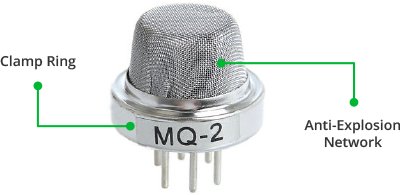
It also protects the sensor and filters out suspended particles, allowing only gaseous elements to pass through the chamber. A copper-plated clamping ring secures the mesh to the rest of the body.
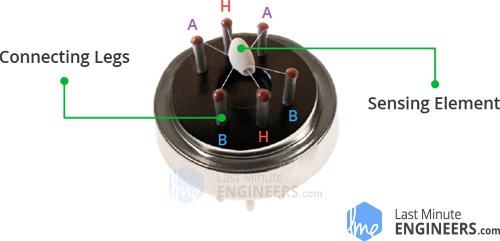
When the outer mesh is removed, the sensor looks like this. The sensing element and six connecting legs that extend beyond the Bakelite base form the star-shaped structure. Two (H) of the six leads are in charge of heating the sensing element and are linked together by a Nickel-Chromium coil (a well-known conductive alloy).
The remaining four signal-carrying leads (A and B) are connected with platinum wires. These wires are connected to the body of the sensing element and convey slight variations in the current flowing through the sensing element.
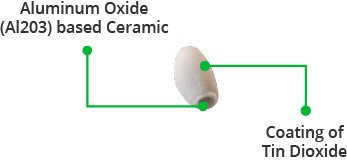
The tubular sensing element is made of Aluminum Oxide (AL2O3) based ceramic with a Tin Dioxide coating (SnO2). Tin Dioxide is the most important material because it is sensitive to combustible gasses. The ceramic substrate, on the other hand, improves heating efficiency and ensures that the sensor area is continuously heated to the working temperature.
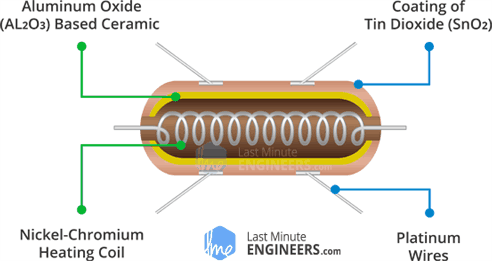
To summarize, the Heating System is composed of a Nickel-Chromium coil and an Aluminum Oxide-based ceramic, while the Sensing System is composed of Platinum wires and a Tin Dioxide coating.
How Does a Gas Sensor Work?
When a SnO2 semiconductor layer is heated to a high temperature, oxygen is adsorbed on the surface. When the air is clean, electrons from the conduction band of tin dioxide are attracted to oxygen molecules. This creates an electron depletion layer just beneath the surface of the SnO2 particles, forming a potential barrier. As a result, the SnO2 film becomes highly resistive and prevents electric current flow.
In the presence of reducing gasses, however, the surface density of adsorbed oxygen decreases as it reacts with the reducing gasses, lowering the potential barrier. As a result, electrons are released into the tin dioxide, allowing current to freely flow through the sensor.

MQ2 Gas Sensor Module Hardware Overview
The MQ2 gas sensor is simple to use and has two different outputs. It not only provides a binary indication of the presence of combustible gasses, but also an analog representation of their concentration in air.
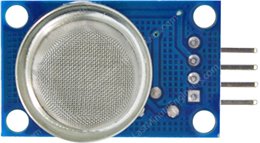
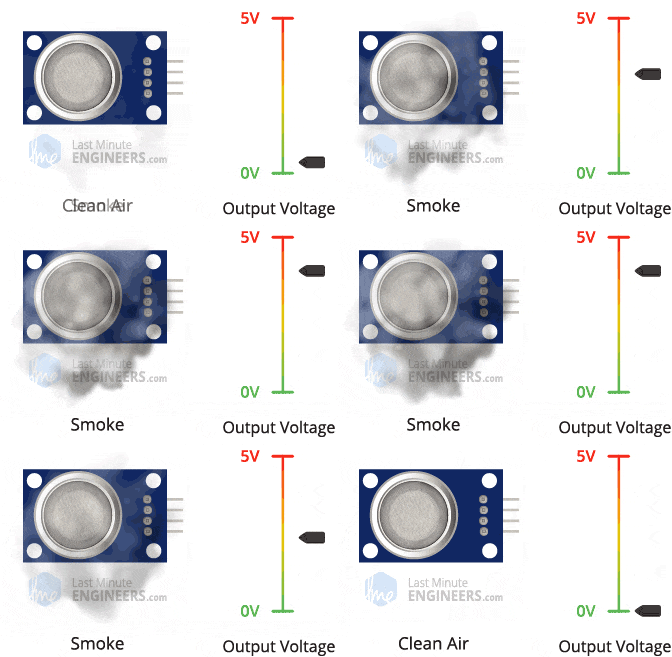
The sensor’s analog output voltage (at the A0 pin) varies in proportion to the concentration of smoke/gas. The higher the concentration, the higher the output voltage; the lower the concentration, the lower the output voltage. The animation below shows the relationship between gas concentration and output voltage.
This analog signal is digitized by an LM393 High Precision Comparator and made available at the Digital Output (D0) pin.
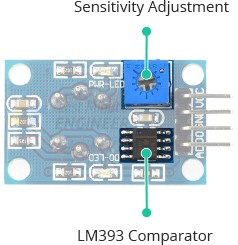
The module includes a potentiometer for adjusting the sensitivity of the digital output (D0). You can use it to set a threshold so that when the gas concentration exceeds the threshold value, the module outputs LOW otherwise HIGH.
Rotating the knob clockwise increases sensitivity and counterclockwise decreases it.
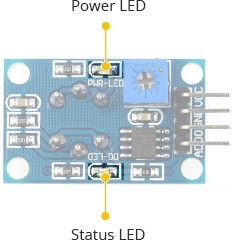
In addition, the module has two LEDs. The Power LED illuminates when the module is turned on, and the Status LED illuminates when the gas concentration exceeds the threshold value.
Technical Specifications
Here are the specifications:
| Operating voltage | 5V |
| Load resistance | 20 KΩ |
| Heater resistance | 33Ω ± 5% |
| Heating consumption | <800mw |
| Sensing Resistance | 10 KΩ – 60 KΩ |
| Concentration Range | 200 – 10000ppm |
| Preheat Time | Over 24 hour |
MQ2 Gas Sensor Module Pinout
Let’s take a look at the pinout now.
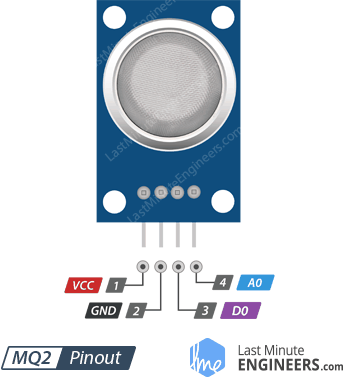
VCC supplies power to the module. Connect it to the 5V output of your Arduino.
GND is the ground pin.
D0 indicates the presence of combustible gasses. D0 becomes LOW when the gas concentration exceeds the threshold value (as set by the potentiometer), and HIGH otherwise.
A0 produces an analog output voltage proportional to gas concentration, so a higher concentration results in a higher voltage and a lower concentration results in a lower voltage.
Calibrating the MQ2 Gas Sensor
Because the MQ2 is a heater-driven sensor, the calibration of the sensor may drift if it is left in storage for an extended period of time.
When first used after a long period of storage (a month or more), the sensor must be fully warmed up for 24-48 hours to ensure maximum accuracy.
If the sensor has recently been used, it will only take 5-10 minutes to fully warm up. During the warm-up period, the sensor typically reads high and gradually decreases until it stabilizes.
Experiment 1 – Measuring Gas Concentration using Analog Output (A0)
In our first experiment, we will read the analog output to determine the concentration of the gas and see if it is within acceptable limits.
Wiring
Let us connect the MQ2 gas sensor to the Arduino.
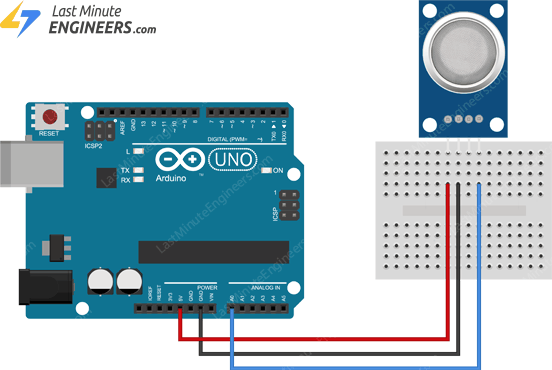
Begin by connecting the VCC pin to the Arduino’s 5V pin and the GND pin to the Arduino’s Ground pin. Finally, connect the module’s A0 output pin to Analog pin #0 on the Arduino.
The following image shows the wiring.
Finding the threshold value
To determine whether the gas concentration is within acceptable limits, you need to record the values your sensor outputs when exposed to various amounts of smoke/gas.
Simply run the sketch below and take your readings.
#define MQ2pin 0

float sensorValue;  //variable to store sensor value

void setup() {
	Serial.begin(9600); // sets the serial port to 9600
	Serial.println("MQ2 warming up!");
	delay(20000); // allow the MQ2 to warm up
}

void loop() {
	sensorValue = analogRead(MQ2pin); // read analog input pin 0

	Serial.print("Sensor Value: ");
	Serial.println(sensorValue);

	delay(2000); // wait 2s for next reading
}
When you run the sketch, you should see readings similar to the ones below:
- In the absence of smoke/gas (around 100)
- In the presence of smoke/gas (around 400)
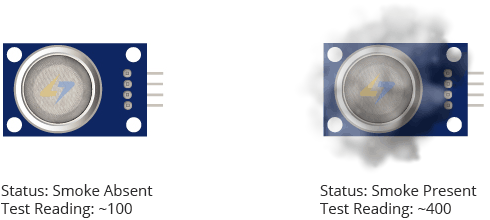
This test may require some trial and error. Once you have the readings, you can use them as a threshold to trigger an action.
Arduino Code
The sketch below determines whether the gas concentration is within acceptable limits.
/* Change the threshold value with your own reading */
#define Threshold 400

#define MQ2pin 0

float sensorValue;  //variable to store sensor value

void setup() {
	Serial.begin(9600); // sets the serial port to 9600
	Serial.println("MQ2 warming up!");
	delay(20000); // allow the MQ2 to warm up
}

void loop() {
  sensorValue = analogRead(MQ2pin); // read analog input pin 0

  Serial.print("Sensor Value: ");
  Serial.print(sensorValue);

  if(sensorValue > Threshold)
  {
    Serial.print(" | Smoke detected!");
  }

  Serial.println("");
  delay(2000); // wait 2s for next reading
}
If everything is fine, you should see something similar on the serial monitor.
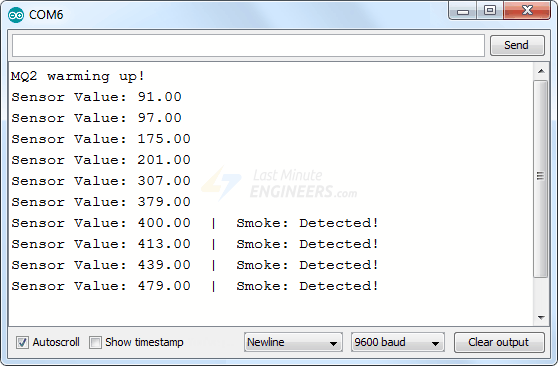
Experiment 2 – Detecting the Presence of Smoke/Gas using Digital Output (D0)
In our second experiment, we will use digital output to detect the presence of smoke/gas.
Wiring
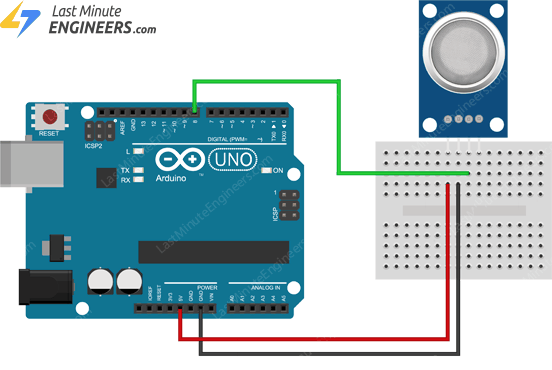
We’ll reuse the previous experiment’s circuit. Simply disconnect the connection to the ADC pin and connect the D0 pin on the module to the Arduino’s digital pin #8.
The following image shows the wiring.
Setting the threshold
The module has a built-in potentiometer for setting the gas concentration threshold above which the module outputs LOW and the status LED lights up.

Now, to set the threshold, place the gas sensor near the smoke/gas you want to detect and turn the pot until the Status LED begins to glow. Then, turn the pot the other way just until the LED goes off.
That’s all there is to it; your module is now ready to use.
Arduino Code
Now, upload the sketch below to your Arduino.
#define MQ2pin 8

int sensorValue;  //variable to store sensor value

void setup() {
	Serial.begin(9600); // sets the serial port to 9600
	Serial.println("MQ2 warming up!");
	delay(20000); // allow the MQ2 to warm up
}

void loop() {
	sensorValue = digitalRead(MQ2pin); // read digital output pin
	Serial.print("Digital Output: ");
	Serial.print(sensorValue);

	// Determine the status
	if (sensorValue) {
		Serial.println("  |  Smoke: -");
	} else {
		Serial.println("  |  Smoke: Detected!");
	}

	delay(2000); // wait 2s for next reading
}
You should see similar output on the serial monitor.
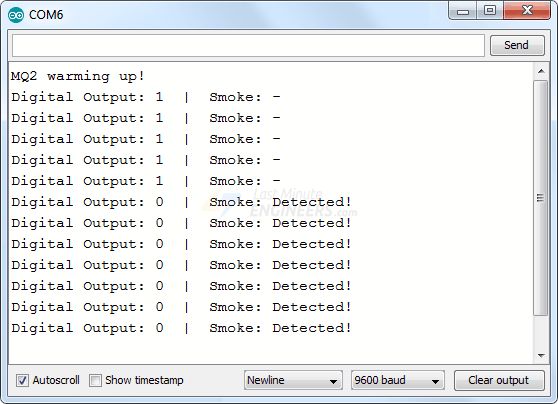








Reviews
There are no reviews yet.